Using Live Spaces for blogging
I have decided to switch to Live Spaces for blogging all the WPF stuff. Its not that Blogger is bad but just that I find it much more easier to use
Live Writer with Spaces. Uploading pictures in Blogger is a pain, especially if you are uploading a couple of them. So starting today I am going over to Live Spaces. Here is my new
Blog Url. BTW, I have a new slideshow application out there.
I will continue to keep this blog but won't be posting here anymore.
Using SmartArt in Word 2007 as images
Word 2007 is a very powerful and rich blog editor and I've spoken about that once over
here. I use it as my default editor for composing posts. This post was also composed within Word 2007 and then copy-pasted into Blogger's Web based editor. It works great for textual content but when it comes to using images, it breaks down a little.
The problem with the Blog settings of Word 2007 is that it is too rudimentary. I can certainly setup Blogger inside Word 2007 but that works only for text. For images I will have to provide a FTP or other location for hosting the images. Unfortunately I have no clue what the hosting server is for the Blogger images. I know I can do from within Blogger but I have no idea where it is uploading to. Also this doesn't seem to be a publicly know piece of information.
The only way to get around this problem is to create the images separately and then upload them through the Blogger Image Upload functionality, which can only be done through the web-based editor.
For creating the rich visuals I would like to use Word 2007's SmartArt feature. Using SmartArt it is possible to create great looking images with very little effort. It also integrates well with Excel for creating graphs/charts, etc. However if you had to export the SmartArt created in Word 2007 as images, there is no direct way to do it. Previously I would use Alt-PrntScreen command to take a snapshot of the screen in Word and then crop the image using an editor like Paint Shop Pro. But this was a tedious process and I always knew there was a better way to do it.
The solutionToday I found a way out, which gives me exactly what I want without any extra hoop-jumping.
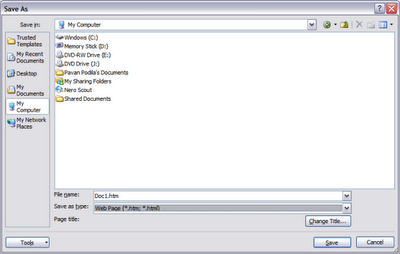
The way to do it is to use the
Save As... command within Word 2007 and select
Web Page (*.htm, *.html) as the save format. Once that is done, Word creates a separate folder for the images and if you look inside that, you will find all your images, just the way you wanted!
Word creates a PNG file that contains the full-size image and also a GIF file which is the compressed version.
Designer - Developer workflow - Part 1
There is certainly lot of information and awareness floating around that Windows Presentation Foundation (WPF) creates a new style of collaboration between the Designer and the Developer. How is that possible? The holding glue is a new XML based language called XAML. There are certain key elements of XAML that make this workflow a possibility. In this series of posts I’ll expound more into the world of XAML and its tools.
A common theme found in XAML is a clear separation of concerns. The logical structure of the page is distinctly separate from its styling. Interface elements like Buttons, Textboxes, Listboxes, etc. can be made to look dramatically different from the classic appearances that we have always known. Animations can be intermixed with static elements like text and they can also be applied on a wide variety of elements. Interface elements are not just limited to 2D but extend to 3D as well. It is thus possible to have a page design that mixes 2D and 3D to create a very immersive experience.
Anatomy of a Control
Underneath all these are some specific XAML elements that make it all happen. If we dissect a single UI element like a Button we can start seeing many layers.
The look:
The topmost layer of course is the appearance or the look of the Button control. We can separate it out into a template and just switch the template to acquire a different look. This idea of templates is more formally called Control Templates. UI controls themselves are of different kinds. On one hand we have a control like a Button that does not contain any other children and on the other hand we have controls like the Listbox which host a list of items or children. In addition to these two types we also have a third type of control, like the Tree, which is a hierarchy of children. So it makes sense that the control template be also be different. Sure enough. We have a ContentTemplate for a Button-like control (aka singular control), an ItemTemplate for a Listbox-like control (plural control) and a HierachicalDataTemplate for a Tree-like control.
The interaction:
Once the look is established we would like to interact with the control and we have events just for that. These events are very similar to the ones in WinForms but with some extra capabilities. In most UI paradigms events always originate from the control and bubble-up to their parent. So if I had a Button inside a Panel and I clicked on the Button, the Button would see the click event first followed by the Panel. In WPF this event propagation strategy is made bottom-up as well as top-down. The top-down approach is where the Panel would see the event first. This is more formally called the tunneling strategy
Trigger the Animations:
In addition to plain events, the control becomes more lively with animations and the way to trigger animations are generally events or some state changes. The way to capture a state change is to use a Trigger. Simply put, a trigger says that when a property changes its value to something, just trigger an action. That action could be an animation or a simple change in the appearance of the control.
To play an animation we first create a Storyboard, which could have one or more animations. An animation is just a time-based, progressive change in the value of a property.
Encapsulating with <Style/>
All of these elements: templates, events, triggers, animations can be captured into a single structure called the Style. Style is a list of property-value pairs for an element which also be used to specify other properties of the control. Thus we can encapsulate the complete anatomy of the control inside a declaration.
The ResourceDictionary --- the mother load
Bundling up the look and feel of a single control is straightforward but how do you encapsulate this information for a 100 different controls, say. The next higher level of organization is the ResourceDictionary. It is a list of name-value pairs where the name stands for a uniquely identifiable resource and the value part of the pair is the resource itself. Resources are not just limited to styles but absolutely any object. So I could have a ResourceDictionary that has a bunch of styles, templates, data-objects, brushes, etc defined that could be used in other parts of the application. I can also nest ResourceDictionaries. In other words if you think your resource-dictionary is growing too long, just break it up into smaller resource-dicationaries and merge them together inside a top-level resource dictionary. That greatly improves the organization of all the resources or assets.
ResourceDictionaries can be then linked into a page and the contained resources can be used by referring to their unique names.
Summary
We have covered enough material to understand the structure of a Control. In the next post I’ll talk about how these concepts can help in the designer-developer collaboration.
Did you miss WWDC 2006 Keynote?
If you are like me and missed the WWDC 2006 keynote by Steve Jobs -- you can watch the streaming webcast
hereInteresting parts:
- PC-Mac Ad in the introduction
- New features in Leopard (Time Machine, Spaces, 64-bit, ...etc..about 10 in all)
